

Building a strong survival base is one of the most important steps to succeeding in Minecraft. Whether you’re playing in a brand-new world or returning to the game in 2026, having a safe and efficient base will protect you from hostile mobs, store your valuable resources, and give you a place to expand your adventures. For beginners, the process can seem overwhelming, but with the right approach, creating a functional survival base is easier than ever.
In this guide, you’ll learn how to build a beginner-friendly survival base in Minecraft, from choosing the perfect location and gathering essential materials to designing secure shelters and organizing storage. By following these tips, you’ll be able to create a reliable home that helps you survive your first nights and thrive throughout your Minecraft journey.
What Materials Do You Need to Start a Minecraft Survival Base
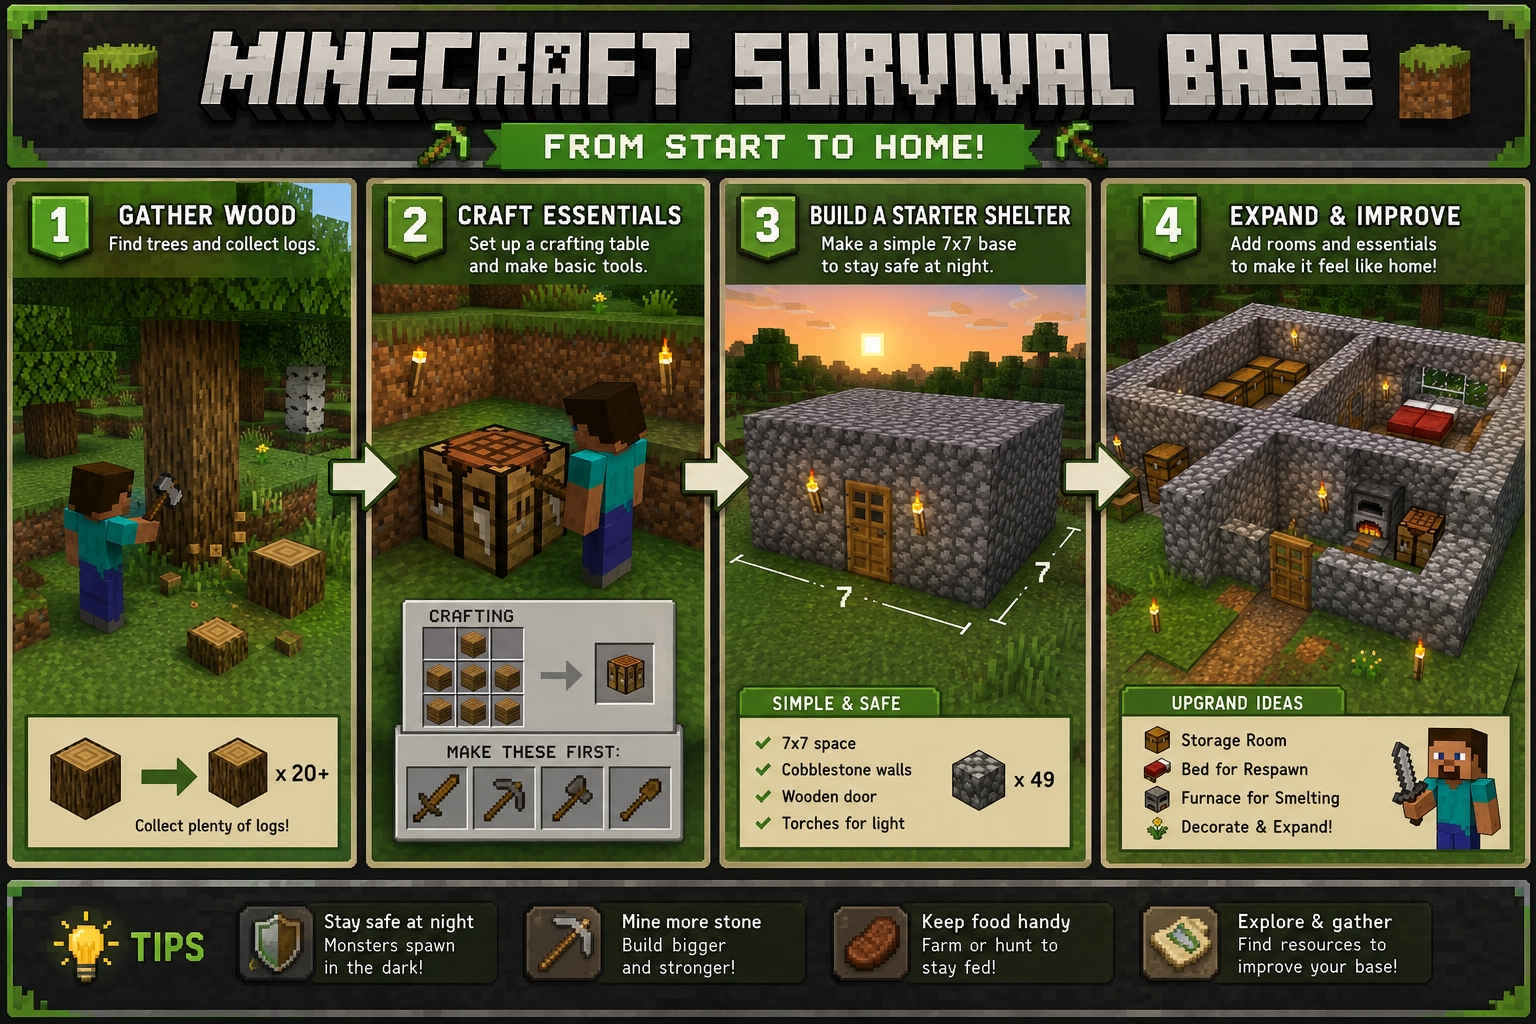
The minimum materials for a functional starter base are wood planks, cobblestone, a door, a bed, torches, and a chest. These cover structure, entry, sleep, lighting, and storage — the five pillars of early survival.
Here is a practical starting list:
- Wood logs (20-30): Used for planks, sticks, a crafting table, and your first tools
- Cobblestone (64+): The main building block for walls and floors — durable and easy to obtain
- Coal or charcoal (8-16): Combined with sticks to craft torches
- Wool (3 blocks, any color): Required to craft a bed and skip the night
- Iron ingots (1-6): Needed for a proper iron door and eventually better tools
Common mistake: Many beginners skip gathering stone and build entirely out of wood planks. Wood is flammable and weaker. Switch to cobblestone walls as soon as a stone pickaxe is available.
For players looking to expand their Minecraft experience beyond vanilla survival, check out the best Minecraft mods for 2026 to add new building blocks and gameplay mechanics.
How Big Should Your First Base Be for Early Game
A first base should be between 7×7 and 10×10 blocks in floor area. This gives enough space for a bed, crafting table, furnace, and chest without requiring excessive materials on Day 1.
Think of the early base in three stages:
- Night 1 shelter: 5×5 or 6×6 room, just enough to survive — built in under 10 minutes
- Week 1 base: Expand to 8×8 or 10×10 with dedicated corners for storage, smelting, and sleeping
- Established base: Add rooms outward rather than rebuilding — a storage room, a farm room, and a crafting room each as separate extensions
Bigger is not always better early on. A 20×20 base sounds impressive but leaves gaps in walls and takes so long to build that night arrives before it is finished.
Best Location Types to Build a Survival Base in Minecraft
The best location for a beginner’s survival base is flat or gently sloped land near a forest, a water source, and visible stone or coal on the surface. Plains and forest biomes offer the easiest terrain for new players.
Key location criteria:
| Factor | Good Choice | Avoid |
|---|---|---|
| Terrain | Flat plains, gentle hills | Cliffs, ravines, ocean shores |
| Resources nearby | Trees, coal seams, rivers | Barren desert, deep ocean |
| Mob exposure | Open land (easy to see threats) | Dense jungle, cave entrances |
| Biome | Plains, forest, savanna | Swamp, deep dark, mushroom island |
Decision rule: If you can see trees, stone, and water from one spot, that location is good enough. Do not spend more than 5 minutes searching for a “perfect” spawn — time spent wandering is time lost before dark.
Finding the right world seed also matters. The best Minecraft seeds guide covers seeds that spawn players near ideal base-building terrain.
What Biomes Are Worst for Building a Survival Base
The worst biomes for beginner base-building are swamps, deep dark, oceans, and dense jungles. Each creates a specific problem that makes early survival harder than it needs to be.
- Swamp: Slime spawns, poor visibility, uneven waterlogged terrain
- Deep dark: Warden spawns, limited light, far from surface resources
- Ocean: No land to build on without significant effort; drowning risk
- Dense jungle: Difficult navigation, limited flat ground, ocelots and parrots do not help with mobs
- Nether: Not a valid early-game base location — no bed, constant hazards
Plains, forests, and savannas remain the top three beginner-friendly biomes in 2026 across both Java and Bedrock editions.
How to Protect Your Base from Mobs at Night
The most effective early-game mob defense is a combination of torches placed every 7-8 blocks inside and around the base, plus a full perimeter fence or wall at least 2 blocks high. Mobs spawn in darkness, so lighting is the single most impactful defense.
Step-by-step mob protection for beginners:
- Light the interior — Place torches on every wall inside the base so no dark corners exist
- Light the perimeter — Extend torches 10-15 blocks outward from all walls
- Build a fence — A wooden or cobblestone fence 2 blocks high prevents most ground mobs from reaching the base
- Add a gate or door — Wooden doors stop zombies on Normal difficulty; iron doors (with a button or lever) are safer
- Sleep every night — Using a bed skips the night entirely and prevents phantom spawning after 3 in-game days without sleep
Edge case: Spiders can climb walls. If spider attacks are frequent, add an overhang (a block jutting outward at the top of the fence) to block climbing.
Cheapest and Easiest Base Design for Minecraft Survival Beginners
The cheapest and easiest base design for beginners is a single-room cobblestone box: 7×7 floor, 4-block-high walls, a flat roof, one wooden door, and torches on every wall. It costs roughly 100 cobblestone blocks and can be completed in under 15 minutes of real time.
Starter base build checklist:
- Place a crafting table first (before building walls)
- Dig 1 block into the ground for the floor — this saves wall material
- Build walls 3-4 blocks high (3 is enough; 4 adds headroom)
- Leave a 1-block gap for a door on one wall
- Add a flat cobblestone or dirt roof
- Place a chest, furnace, and bed inside before adding torches last
This design is not beautiful, but it works. Aesthetics can come later — survival comes first.
What Is the Difference Between a Shelter and a Full Survival Base
A shelter is a temporary structure built to survive one or two nights. A survival base is a permanent, expandable home that supports crafting, storage, farming, and long-term progression. Beginners often confuse the two and either over-invest in a shelter or under-build a base.
| Feature | Shelter | Survival Base |
|---|---|---|
| Purpose | Survive tonight | Support long-term gameplay |
| Size | Minimal (5×5 or smaller) | Expandable (starts 7×7+) |
| Contents | Bed only | Bed, chests, furnace, crafting table |
| Build time | Under 5 minutes | 15-60+ minutes |
| Permanence | Temporary | Long-term or permanent |
The practical approach is to build a shelter on Night 1, then convert or replace it with a proper base once Day 2 resources are gathered.
How Much Resources Should You Gather Before Starting Your Base
Gather enough resources to complete the build before starting construction. For a basic 7×7 cobblestone base, that means having at least 100 cobblestone, 10 wood planks, 8 torches, 1 door, and 1 bed ready before placing the first wall.
A simple pre-build resource checklist:
- 100-150 cobblestone blocks
- 20-30 wood planks (for crafting table, door, sticks)
- 8-16 torches
- 3 wool blocks (for a bed)
- 1-2 furnaces worth of coal (8+ coal)
Why this matters: Starting construction without enough materials leads to half-built walls when night arrives. Gather first, build second. A full Day 1 of resource collection makes Day 1 night construction fast and safe.
Can You Build a Base Underground Instead of Above Ground
Yes, underground bases are a completely valid and often easier option for beginners. Digging into a hillside or straight down eliminates the need for wall materials because the earth forms the walls naturally. The main cost is time spent digging rather than blocks spent building.
Advantages of underground bases:
- No need for large quantities of cobblestone for walls
- Natural insulation from mob spawns (if lit correctly)
- Easier to expand by digging new rooms
- Hidden from other players in multiplayer
Disadvantages:
- Requires torches immediately to prevent mob spawning inside
- No natural light (windows are not possible without significant effort)
- Risk of digging into caves with hostile mobs
Best approach: Dig into the side of a hill rather than straight down. This gives a natural entrance, easy access to the surface, and avoids the risk of falling into an unlit cave.
How to Build a Survival Base in Minecraft for Beginners: Recommended Layout for Solo vs. Multiplayer
Solo bases should be compact and centralized, with everything within a few steps of the bed. Multiplayer bases need clear zones, shared storage systems, and enough space that multiple players are not constantly blocking each other.
Solo base layout (recommended rooms):
- Main room: bed, crafting table, furnace, personal chest
- Storage room (added later): organized chests by category
- Farm room or outdoor farm: wheat, carrots, potatoes
Multiplayer base layout (recommended additions):
- Shared storage room with labeled chests
- Individual player rooms or chests to avoid item conflicts
- A central common area with crafting stations
- Clear pathways between functional zones
In multiplayer, communication about base location matters as much as the build itself. Starting a server with friends? The best Minecraft mods for Bedrock Edition include several that improve multiplayer base management.
How to Make Your Base Look Good Without Advanced Building Skills
A base looks significantly better with three simple techniques: using more than one block type for walls, adding proper interior lighting with lanterns or glowstone instead of plain torches, and including at least one decorative element like a window or a flower pot.
Quick aesthetic upgrades that require no advanced skill:
- Mix cobblestone and stone bricks on exterior walls for texture variety
- Add windows using glass panes — a 2×1 gap in a wall covered with glass panes takes under a minute
- Use slabs for roofing instead of full blocks — slab roofs look cleaner and use fewer materials
- Place lanterns on the ground or hang them from ceilings for warmer lighting
- Add a path of gravel or stone bricks leading to the door
None of these require advanced building knowledge. They take an extra 5-10 minutes and make a significant visual difference.
Common Beginner Mistakes When Building a Survival Base in Minecraft
The most common beginner mistake is starting to build too late in the day, leaving no time to finish before hostile mobs spawn. The second most common mistake is building with only one material, which creates a flat, featureless structure that is harder to navigate and less satisfying to play in.
Full list of mistakes to avoid:
- Building at sunset: Start construction at dawn (in-game) to have a full day
- No torches inside: A dark interior spawns mobs inside the base
- Forgetting a bed: Without a bed, every night must be survived, not skipped
- Building too far from resources: A base far from trees, stone, or water makes early expansion slow
- No chest on Day 1: Inventory fills fast — a chest prevents losing items on an early death
- Skipping a door: An open entrance lets all mobs walk in freely
Learning from these mistakes early saves hours of frustration. For players new to survival games in general, the same “plan before you act” principle applies across many titles — including the best class choices for beginners in Baldur’s Gate 3.
How to Build a Survival Base in Minecraft for Beginners: Step-by-Step Day 1 Walkthrough
This walkthrough covers the full first day and night of base construction for a new Minecraft survival world in 2026.
Minutes 0-5: Gather wood
- Punch trees to collect 20-30 wood logs
- Craft a crafting table and place it on the ground
- Craft wooden planks, then a wooden pickaxe and axe
Minutes 5-10: Find stone and coal
- Use the wooden pickaxe to mine 100+ cobblestone
- Look for coal ore (black specks in stone) and mine 8-16 pieces
- Craft torches immediately (coal + stick = 4 torches)
Minutes 10-20: Choose a location and build
- Find flat ground near trees and water
- Lay out a 7×7 floor plan using cobblestone
- Build walls 3-4 blocks high, leaving a 1-block door gap
- Add a flat cobblestone roof
Minutes 20-30: Furnish and secure
- Place a crafting table, furnace, and chest inside
- Craft and place a door
- Place torches on all interior walls
- If wool was found, craft and place a bed
By the time the sun sets (roughly 10 minutes of real time into a new world), the base should be enclosed and lit. Everything else is expansion.
If you are just getting started with Minecraft and need an account, the free Minecraft account guide covers both free and premium options available in 2026.
Frequently Asked Questions (FAQs)
How long does it take to build a basic survival base in Minecraft?
A functional starter base takes 15-30 minutes of real time on Day 1, assuming basic resources are gathered first. More polished bases with multiple rooms take 1-3 hours across several in-game days.
What is the best block to build a survival base with for beginners?
Cobblestone is the best beginner building block. It is fireproof, blast-resistant compared to wood, and available in large quantities from any stone surface. It also cannot be burned by Ghast fireballs, unlike wood.
Do I need to build a fence around my base?
A fence is not required but strongly recommended. A 2-block-high fence or wall around the base perimeter prevents most ground mobs from reaching the walls and gives players time to react to threats before they reach the door.
Can mobs break into my base?
On Normal and Hard difficulty, zombies can break down wooden doors. Using an iron door (opened with a button or lever) prevents this. Creeper explosions can also destroy walls, so keeping the perimeter lit reduces creeper spawns nearby.
What is the best biome to build a first base in Minecraft?
Plains biomes are the best for beginners. They offer flat terrain, visible surface resources, nearby forests, and lower mob density compared to jungles or swamps. Savanna biomes are a close second.
Should I build my base near my spawn point?
Yes, for beginners. Building near the world spawn point means that if you die without a bed set, you respawn close to your base. Set a bed inside the base as soon as possible to override the world spawn.
How do I stop mobs from spawning inside my base?
Place torches or other light sources so that no block inside the base has a light level below 8. In practice, placing a torch every 7-8 blocks in all directions covers this. Glowstone and lanterns are more effective single-block light sources.
Final Thoughts
Learning how to build a survival base in Minecraft for beginners comes down to three priorities: gather before you build, keep the first structure small and functional, and light everything. A 7×7 cobblestone room with a bed, chest, furnace, crafting table, and torches is all that stands between a new player and a frustrating first night.
Actionable next steps:
- Start a new survival world and spend the full first day gathering wood, cobblestone, and coal before placing a single wall
- Build a 7×7 cobblestone shelter before sunset on Day 1
- Add a bed on Day 2 to control respawn and skip dangerous nights
- Expand one room at a time — storage first, then farming, then aesthetics
- Experiment with underground bases as a second playthrough to compare the experience
The base is not the destination — it is the launching point for everything else in the game. Keep it functional early, and improve it as resources allow. For players who want to push further, exploring the best Minecraft seeds can place a new world in terrain that makes base-building faster and more rewarding from the very first spawn.


